技术精华-Redisson分布式延迟队列原理解析
使用
java
public void test(){
    RBlockingQueue<String> blockingQueue = redissonClient.getBlockingQueue("test_queue");
    RDelayedQueue<String> delayedQueue = redissonClient.getDelayedQueue(blockingQueue);
    new Thread(() -> {
        while(true) {
            try {
                //阻塞队列有数据就返回,没有数据则已知等待
                System.out.println("取得延迟信息:"+blockingQueue.take());
            } catch (InterruptedException e) {
                e.printStackTrace();
            }
        }
    }).start();

    // 向阻塞队列放入数据
    delayedQueue.offer("test", 5, TimeUnit.SECONDS);
}
初始化的流程
阻塞队列的初始化
java
RBlockingQueue<String> blockingQueue = redissonClient.getBlockingQueue("test_queue");java
@Override
public <V> RBlockingQueue<V> getBlockingQueue(String name) {
    return new RedissonBlockingQueue<V>(commandExecutor, name, this);
}这里是创建了RedissonBlockingQueue,RedissonBlockingQueue的继承类层级比较深,一直往里看,到最里层能看到:
java
public RedissonObject(Codec codec, CommandAsyncExecutor commandExecutor, String name) {
    this.codec = codec;
    this.commandExecutor = commandExecutor;
    if (name == null) {
        throw new NullPointerException("name can't be null");
    }

    setName(name);
}

protected final void setName(String name) {
    this.name = commandExecutor.getConnectionManager().getConfig().getNameMapper().map(name);
}能看到,这里是创建了RedissonObject对象,在创建的过程中,分别设置了codec、commandExecutor、name
codec是编码方式commandExecutor是执行器name这个要重点关注,是队列的名字,在本示例中也就是test_queue
延迟队里的初始化
java
RDelayedQueue<String> delayedQueue = redissonClient.getDelayedQueue(blockingQueue);java
@Override
public <V> RDelayedQueue<V> getDelayedQueue(RQueue<V> destinationQueue) {
    if (destinationQueue == null) {
        throw new NullPointerException();
    }
    return new RedissonDelayedQueue<V>(queueTransferService, destinationQueue.getCodec(), commandExecutor, destinationQueue.getName());
}将上一步阻塞队列的初始化创建出来的blockingQueue当做参数传入进去,来创建RedissonDelayedQueue对象,除了第一个参数,剩下的三个参数和创建blockingQueue时是相同的
queueTransferServiceredisson客户端生成的队列任务调度的对象,用来启动延迟队列执行任务的codec编码方式,和blockingQueue的编码方式相同commandExecutor是执行器name队列的名字,也就是blockingQueue的队列名字
我们再往里看,然后就是重点的部分了
java
protected RedissonDelayedQueue(QueueTransferService queueTransferService, Codec codec, final CommandAsyncExecutor commandExecutor, String name) {
    //这步和创建RBlockingQueue的流程相同,也是构建RedissonObject,设置codec、commandExecutor、name
    super(codec, commandExecutor, name);
    //设置通道的名称,用于延迟队列的发布订阅,名字用`redisson_delay_queue_channel`当做前缀来拼接
    channelName = prefixName("redisson_delay_queue_channel", getRawName());
    //list类型的延迟队列,将到期的数据加入此延迟队列中,保证了消费的顺序。名字用`redisson_delay_queue`当做前缀来拼接
    queueName = prefixName("redisson_delay_queue", getRawName());
    //zset类型的延迟队列,以过期时间为score,按照过期时间从小到大来排序。名字用`redisson_delay_queue_timeout`当做前缀来拼接
    timeoutSetName = prefixName("redisson_delay_queue_timeout", getRawName());
    //QueueTransferTask任务,操作延迟队列中的数据,稍后会详细分析
    QueueTransferTask task = new QueueTransferTask(commandExecutor.getConnectionManager()) {

        @Override
        protected RFuture<Long> pushTaskAsync() {
            return commandExecutor.evalWriteAsync(getRawName(), LongCodec.INSTANCE, RedisCommands.EVAL_LONG,
                    "local expiredValues = redis.call('zrangebyscore', KEYS[2], 0, ARGV[1], 'limit', 0, ARGV[2]); "
                  + "if #expiredValues > 0 then "
                      + "for i, v in ipairs(expiredValues) do "
                          + "local randomId, value = struct.unpack('dLc0', v);"
                          + "redis.call('rpush', KEYS[1], value);"
                          + "redis.call('lrem', KEYS[3], 1, v);"
                      + "end; "
                      + "redis.call('zrem', KEYS[2], unpack(expiredValues));"
                  + "end; "
                    // get startTime from scheduler queue head task
                  + "local v = redis.call('zrange', KEYS[2], 0, 0, 'WITHSCORES'); "
                  + "if v[1] ~= nil then "
                     + "return v[2]; "
                  + "end "
                  + "return nil;",
                  Arrays.<Object>asList(getRawName(), timeoutSetName, queueName),
                  System.currentTimeMillis(), 100);
        }
        //延迟队列的发布订阅topic,也就是channelName来决定
        @Override
        protected RTopic getTopic() {
            return RedissonTopic.createRaw(LongCodec.INSTANCE, commandExecutor, channelName);
        }
    };

    //执行任务,其中就包括了执行上述的lua逻辑
    queueTransferService.schedule(queueName, task);
    //启动延迟队列执行任务
    this.queueTransferService = queueTransferService;
}
java
public static String prefixName(String prefix, String name) {
    if (name.contains("{")) {
        return prefix + ":" + name;
    }
    return prefix + ":{" + name + "}";
}到这里我们看到了核心的lua脚本执行的流程,这里先不急着去分析,我们先要知道它是在什么时候来执行的,这里就要去分析queueTransferService.schedule(queueName, task);方法
操作队列中的数据
java
public class QueueTransferService {

    private final ConcurrentMap<String, QueueTransferTask> tasks = new ConcurrentHashMap<>();

    public synchronized void schedule(String name, QueueTransferTask task) {
        QueueTransferTask oldTask = tasks.putIfAbsent(name, task);
        if (oldTask == null) {
            task.start();
        } else {
            oldTask.incUsage();
        }
    }
}- 将上一步构建出QueueTransferTask 任务对象放入到ConcurrentHashMap中,key为队列name,value为QueueTransferTask 任务对象
- 如果之前ConcurrentHashMap中不存在此任务,则开始此任务的执行
- 如果任务已存在,则对任务计数器+1
下面来分析任务的执行task.start()的流程
任务的执行
java
public void start() {
    //获取延迟队列的RTopic对象
    RTopic schedulerTopic = getTopic();
    //订阅该通道并进行注册监听器,当有新的客户端订阅该topic时会执行pushTask
    statusListenerId = schedulerTopic.addListener(new BaseStatusListener() {
        @Override
        public void onSubscribe(String channel) {
            pushTask();
        }
    });
	//订阅通道并注册发布监听器,当有消息发布时执行scheduleTask
    messageListenerId = schedulerTopic.addListener(Long.class, new MessageListener<Long>() {
        @Override
        public void onMessage(CharSequence channel, Long startTime) {
            scheduleTask(startTime);
        }
    });
}getTopic()方法就是在构建RedissonDelayedQueue流程中进行实现的pushTask是用来进行操作延迟队列scheduleTask是控制时间轮来调用pushTaskpushTask和scheduleTask的方法是相互调用的,能保证一直会有一个任务在处理或者等待处理延迟列中的数据
接下来就来分析pushTask方法的流程
pushTask方法
java
private void pushTask() {
    //pushTaskAsync总结起来就是从延迟队列中取出数据,然后放入阻塞队列
    RFuture<Long> startTimeFuture = pushTaskAsync();
    startTimeFuture.onComplete((res, e) -> {
        if (e != null) {
        	//能执行到这,说明pushTaskAsync执行没有获取到下条数据的到期时间,也可以说延迟队列中没有数据了
            if (e instanceof RedissonShutdownException) {
                return;
            }
            log.error(e.getMessage(), e);
            //调用scheduleTask,入参为是当前的时间戳+5s
            scheduleTask(System.currentTimeMillis() + 5 * 1000L);
            return;
        }

        if (res != null) {
       	 	//执行到这,说明pushTaskAsync执行获取到了下条数据的到期时间
        	//scheduleTask为延迟队列下条数据的到期时间,可能大于当前时间也可能小于当前时间
            scheduleTask(res);
        }
    });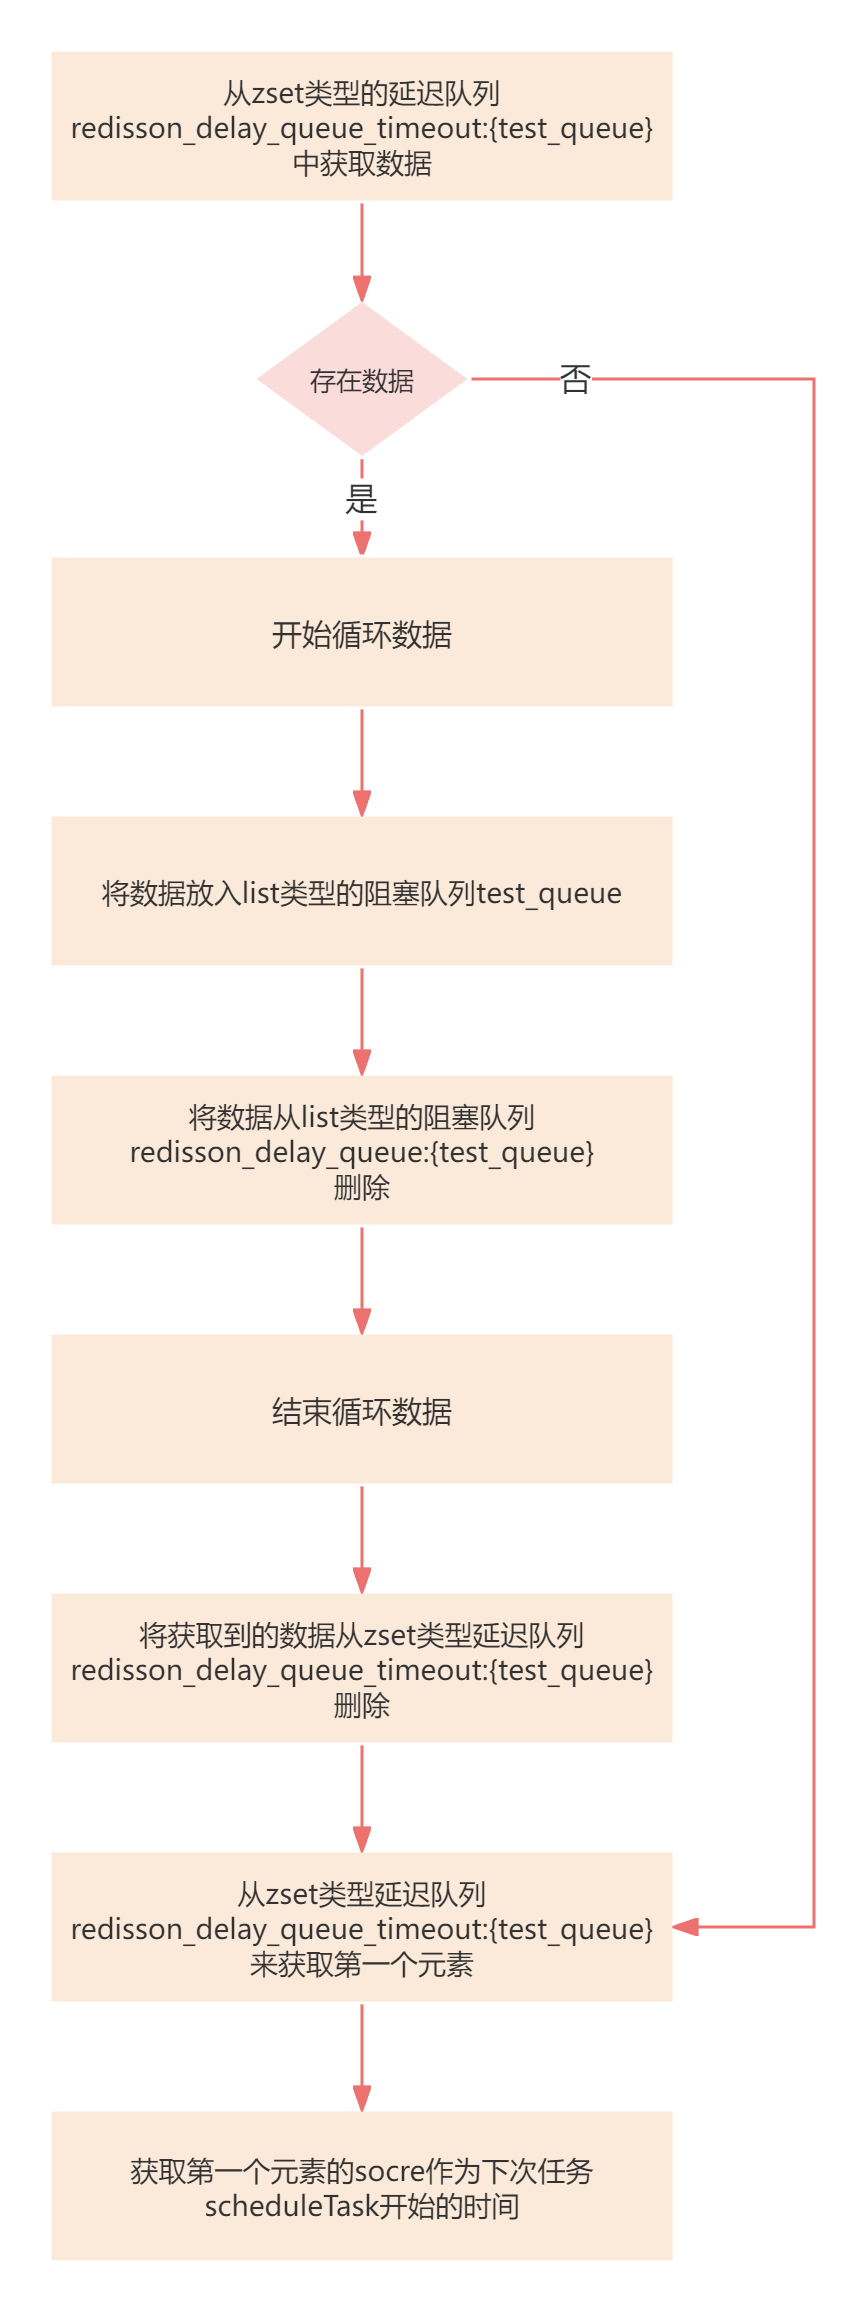
}这里的pushTaskAsync()方法,其实就是之前没有分析的lua脚本逻辑
pushTaskAsync方法
java
QueueTransferTask task = new QueueTransferTask(commandExecutor.getConnectionManager()) {

    @Override
    protected RFuture<Long> pushTaskAsync() {
        return commandExecutor.evalWriteAsync(getRawName(), LongCodec.INSTANCE, RedisCommands.EVAL_LONG,
                //通过zrangebyscore命令,从zset类型延迟队列redisson_delay_queue_timeout:{test_queue}中,
                //获取score范围为[0, 当前时间戳]的前100个数据
                "local expiredValues = redis.call('zrangebyscore', KEYS[2], 0, ARGV[1], 'limit', 0, ARGV[2]); "
                //如果获取到了数据
              + "if #expiredValues > 0 then "
                    //循环这些数据
                  + "for i, v in ipairs(expiredValues) do "
                        //将数据进行解码
                      + "local randomId, value = struct.unpack('dLc0', v);"
                        //将数据放入list类型的阻塞队列test_queue
                      + "redis.call('rpush', KEYS[1], value);"
                        //将数据从list类型的阻塞队列redisson_delay_queue:{test_queue}删除
                      + "redis.call('lrem', KEYS[3], 1, v);"
                  + "end; "
                    //将获取到的数据从zset类型延迟队列redisson_delay_queue_timeout:{test_queue}删除
                  + "redis.call('zrem', KEYS[2], unpack(expiredValues));"
              + "end; "
                //get startTime from scheduler queue head task
                //从zset类型延迟队列redisson_delay_queue_timeout:{test_queue}来获取第一个元素,
                //用于获取下一个到期的元素的时间
              + "local v = redis.call('zrange', KEYS[2], 0, 0, 'WITHSCORES'); "
              + "if v[1] ~= nil then "
                    //如果存在的话,则返回下一个需要进行处理数据的时间
                 + "return v[2]; "
              + "end "
              + "return nil;",
              Arrays.<Object>asList(getRawName(), timeoutSetName, queueName),
              System.currentTimeMillis(), 100);
    }

    @Override
    protected RTopic getTopic() {
        return RedissonTopic.createRaw(LongCodec.INSTANCE, commandExecutor, channelName);
    }
};
参数说明:
KEYS[1]test_queueKEYS[2]redisson_delay_queue_timeout:{test_queue}KEYS[3]redisson_delay_queue:{test_queue}ARGV[1]当前时间戳ARGV[2]100
总结起来一句话:
- 从zset类型的延迟队列中将数据取出,再放入到list类型的阻塞队列中
流程图
接下来就开始分析scheduleTask定时任务的执行流程
定时任务
java
private final AtomicReference<TimeoutTask> lastTimeout = new AtomicReference<TimeoutTask>();
private final ConnectionManager connectionManager;

public QueueTransferTask(ConnectionManager connectionManager) {
    super();
    this.connectionManager = connectionManager;
}

private void scheduleTask(final Long startTime) {
    //上一个的TimeoutTask
    TimeoutTask oldTimeout = lastTimeout.get();
    if (startTime == null) {
        return;
    }
    //如果旧的任务存在,则进行取消
    if (oldTimeout != null) {
        oldTimeout.getTask().cancel();
    }
    //startTime是上一步从zset延迟队列获取的第一个元素的socre
    //计算startTime和当前时间戳的差值
    long delay = startTime - System.currentTimeMillis();
    //如果差值大于10ms
    if (delay > 10) {
        //生成新的Timeout,延迟时间为delay,这里用的是HashedWheelTimeout
        //可以理解成就是一个定时任务的调度器
        Timeout timeout = connectionManager.newTimeout(new TimerTask() {
            @Override
            public void run(Timeout timeout) throws Exception {
                //执行pushtask方法,上面详细介绍过
                pushTask();
                //该时间轮任务已处理完,对lastTime进行处理
                TimeoutTask currentTimeout = lastTimeout.get();
                if (currentTimeout.getTask() == timeout) {
                    //将当前任务清除
                    lastTimeout.compareAndSet(currentTimeout, null);
                }
            }
        }, delay, TimeUnit.MILLISECONDS);
        if (!lastTimeout.compareAndSet(oldTimeout, new TimeoutTask(startTime, timeout))) {
            //将新生成的任务放到lastTime
            //lastTime设置失败,说明有其他的任务也在处理,需要将该线程新建的时间轮任务停掉
            timeout.cancel();
        }
    } else {
        //如果差值小于10ms,则直接执行pushTask方法
        pushTask();
    }
}
Redisson延迟队列初始化流程总结:
- 有新的客户端进行订阅时,立刻执行
pushTask操作延迟队列的数据,然后会调用scheduleTaskpushTask流程- 从zset类型的延迟队列中将数据取出,再放入到list类型的阻塞队列中
- 调用
scheduleTask方法,会延迟再去调用pushTask
- 对于当有新的消息发布时,会调用
scheduleTask根据添加消息的延迟时间判断进行时间轮询的处理还是立即调用pushTask pushTask和scheduleTask的相互调用,能保证一直会有一个任务正在操作或者等待操作延迟列中的数据(操作是指拉取zset类型延迟队列的数据,再放入到list类型的阻塞队列中)
发送数据的流程
java
// 向阻塞队列放入数据
delayedQueue.offer("test", 5, TimeUnit.SECONDS);
java
@Override
public void offer(V e, long delay, TimeUnit timeUnit) {
    get(offerAsync(e, delay, timeUnit));
}
java
public RFuture<Void> offerAsync(V e, long delay, TimeUnit timeUnit) {
        if (delay < 0) {
            throw new IllegalArgumentException("Delay can't be negative");
        }
        //将消息的延迟时间+当前时间戳得到timeout时间戳
        long delayInMs = timeUnit.toMillis(delay);
        long timeout = System.currentTimeMillis() + delayInMs;
        //生成随机id
        long randomId = ThreadLocalRandom.current().nextLong();
        //执行向zset类型延迟队列和list类型阻塞队列中插入数据
        return commandExecutor.evalWriteAsync(getRawName(), codec, RedisCommands.EVAL_VOID,
                //将数据进行编码
                "local value = struct.pack('dLc0', tonumber(ARGV[2]), string.len(ARGV[3]), ARGV[3]);"
                //将数据放到zset类型的延迟队列中
              + "redis.call('zadd', KEYS[2], ARGV[1], value);"
                //将数据放到list类型的阻塞队列中
              + "redis.call('rpush', KEYS[3], value);"
                // if new object added to queue head when publish its startTime
                // to all scheduler workers
                //从zset类型延迟队列中获取第一个数据,也就是最先到期的数据
              + "local v = redis.call('zrange', KEYS[2], 0, 0); "
              + "if v[1] == value then "
                   //如果新插入的数据和第一个到期的数据相等,则将当前插入数据的过期时间发布出去
                   //发布的原因是新插入数据的到期时间小于当前时间能够触发消息监听器立即进行处理,减少时间差
                 + "redis.call('publish', KEYS[4], ARGV[1]); "
              + "end;",
              Arrays.<Object>asList(getRawName(), timeoutSetName, queueName, channelName),
              timeout, randomId, encode(e));
}
参数说明:
KEYS[1]test_queueKEYS[2]redisson_delay_queue_timeout:{test_queue}KEYS[3]redisson_delay_queue:{test_queue}KEYS[4]redisson_delay_queue_channel:{test_queue}ARGV[1]timeout 延迟时间的时间戳ARGV[2]randomId 随机idARGV[3]编码后的数据
Redisson延迟队列添加消息流程总结:
- 将数据进行编码
- 将数据放入zset类型的延迟队列中
- 将数据放入list类型的阻塞队列中
- 判断新插入的数据和第一个到期的数据是否相等,是的话进行发布
消费数据的流程
java
//阻塞队列有数据就返回,没有数据则已知等待
System.out.println("取得延迟信息:"+blockingQueue.take());
java
@Override
public V take() throws InterruptedException {
    return commandExecutor.getInterrupted(takeAsync());
}
java
RedisCommand<Object> BLPOP_VALUE = new RedisCommand<Object>("BLPOP", new ListObjectDecoder<Object>(1));

@Override
public RFuture<V> takeAsync() {
    return commandExecutor.writeAsync(getRawName(), codec, RedisCommands.BLPOP_VALUE, getRawName(), 0);
}能看到消费数据的流程比较简单,就是利用list类型的阻塞队列的BLPOP命令来获取消息数据的
BLPOP的命令特点:
- 如果list队列存在数据,则返回数据
- 如果list队列中没有数据,则进行阻塞,直到有数据存在
更新: 2024-05-05 14:28:20
原文: https://www.yuque.com/u22210564/ykdrdh/fmfebbqyfask5ymo